Developer Guide
- Acknowledgements
- Setting up, getting started
- Design
- Implementation
- Documentation, logging, testing, configuration, dev-ops
- Appendix: Requirements
- Appendix: Instructions for manual testing
Acknowledgements
Setting up, getting started
Refer to the guide Setting up and getting started.
Design
.puml files used to create diagrams in this document can be found in the diagrams folder. Refer to the PlantUML Tutorial at se-edu/guides to learn how to create and edit diagrams.
Architecture
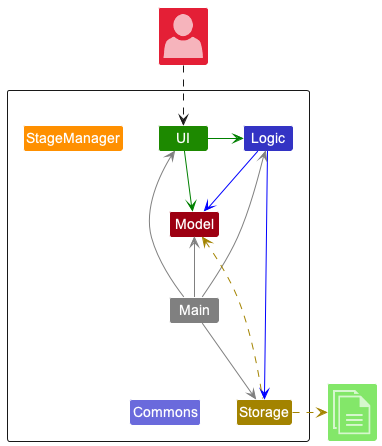
The Architecture Diagram given above explains the high-level design of the App.
Given below is a quick overview of main components and how they interact with each other.
Main components of the architecture
Main has two classes called Main and MainApp. It is responsible for,
- At app launch: Initializes the components in the correct sequence, and connects them up with each other.
- At shut down: Shuts down the components and invokes cleanup methods where necessary.
Commons represents a collection of classes used by multiple other components.
The rest of the App consists of five components.
-
UI: The UI of the App. -
Logic: The command executor. -
Model: Holds the data of the App in memory. -
Storage: Reads data from, and writes data to, the hard disk. -
StageManager: Keeps track of the App’s current stage.
How the architecture components interact with each other
The Sequence Diagram below shows how the components interact with each other for the scenario where the user issues the command delete 1.
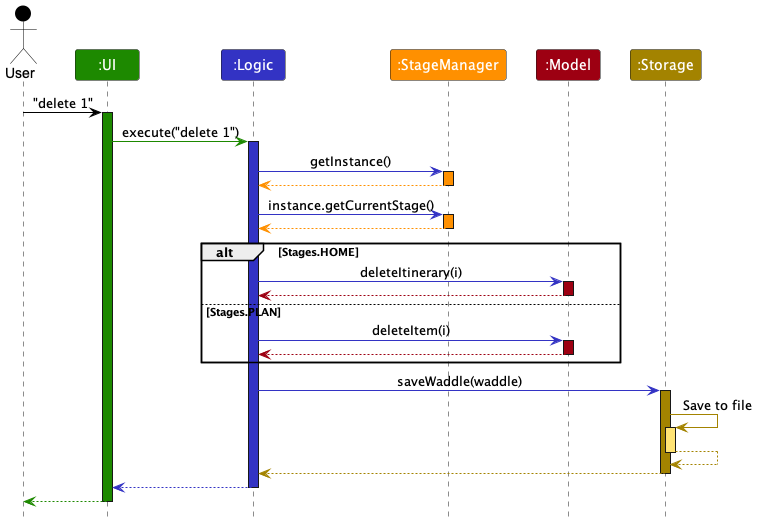
StageManager (shown in the diagram above) uses the Singleton pattern and is accessible by the Logic component for checking and changing the app’s current stage.
The other four main components (also shown in the diagram above),
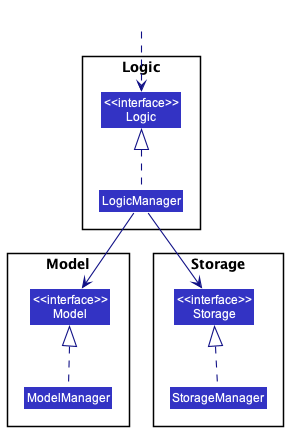
- defines its API in an
interfacewith the same name as the Component. - implements its functionality using a concrete
{Component Name}Managerclass (which follows the corresponding APIinterfacementioned in the previous point.
For example, the Logic component defines its API in the Logic.java interface and implements its functionality using the LogicManager.java class which follows the Logic interface. Other components interact with a given component through its interface rather than the concrete class (reason: to prevent outside component’s being coupled to the implementation of a component), as illustrated in the (partial) class diagram below.
The sections below give more details of each component.
UI component
The API of this component is specified in Ui.java
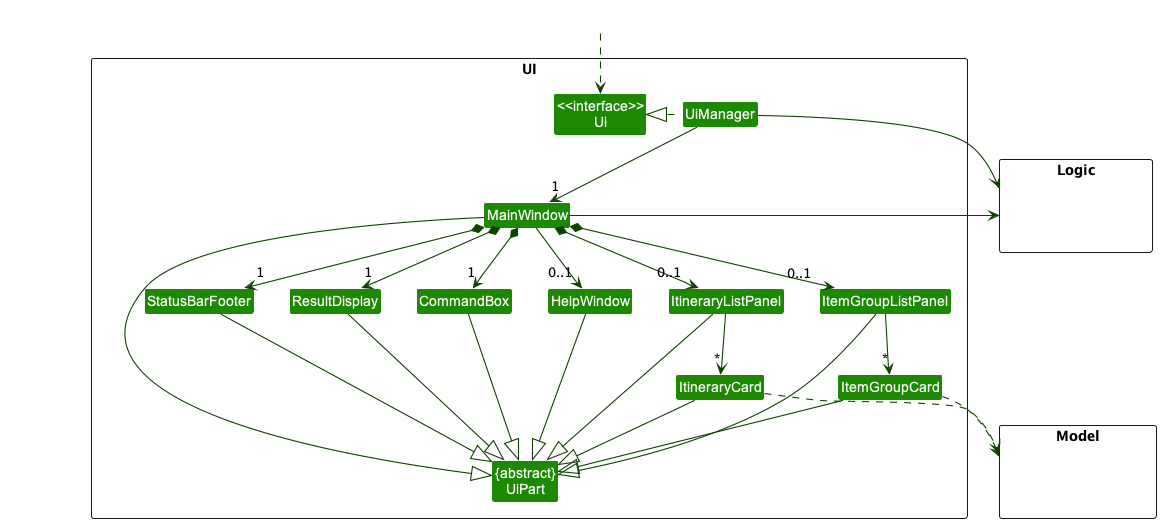
The UI consists of a MainWindow that is made up of parts e.g.CommandBox, ResultDisplay, ItineraryListPanel, ItemGroupListPanel, StatusBarFooter etc. All these, including the MainWindow, inherit from the abstract UiPart class which captures the commonalities between classes that represent parts of the visible GUI.
The UI component uses the JavaFx UI framework. The layout of these UI parts are defined in matching .fxml files that are in the src/main/resources/view folder. For example, the layout of the MainWindow is specified in MainWindow.fxml
The UI component,
- executes user commands using the
Logiccomponent. - listens for changes to
Modeldata so that the UI can be updated with the modified data. - keeps a reference to the
Logiccomponent, because theUIrelies on theLogicto execute commands. - depends on some classes in the
Modelcomponent, as it displaysItineraryobject residing in theModel.
Logic component
API : Logic.java
Here’s a (partial) class diagram of the Logic component:
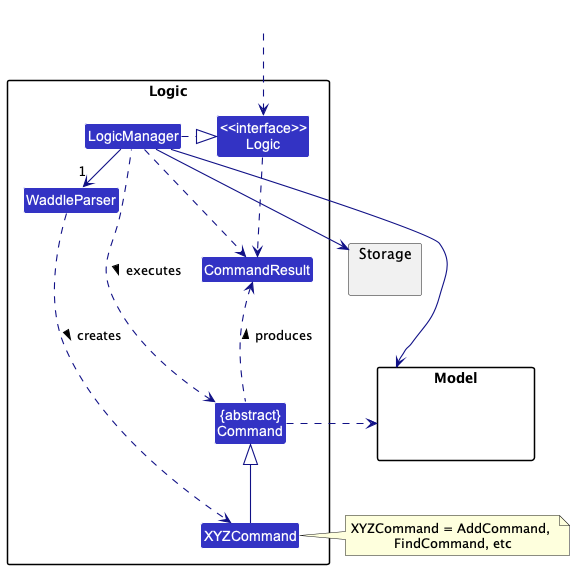
How the Logic component works:
- When
Logicis called upon to execute a command, it uses theWaddleParserclass to parse the user command. - This results in a
Commandobject (more precisely, an object of one of its subclasses e.g.,AddCommand) which is executed by theLogicManager. - The command can communicate with the
Modelwhen it is executed (e.g. to add an item). - The result of the command execution is encapsulated as a
CommandResultobject which is returned back fromLogic.
The Sequence Diagram below illustrates the interactions within the Logic component for the execute("delete 1") API call.
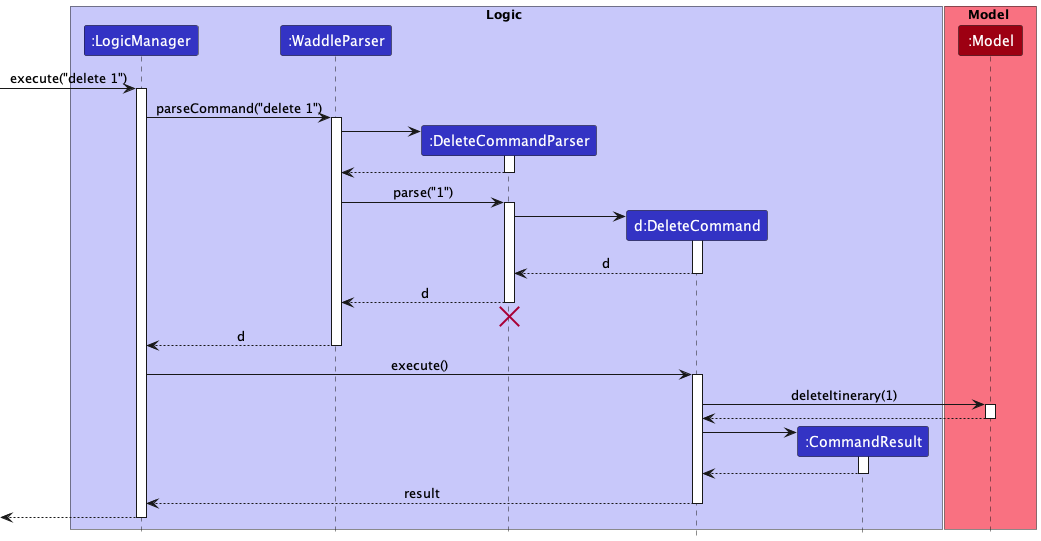
DeleteCommandParser should end at the destroy marker (X) but due to a limitation of PlantUML, the lifeline reaches the end of diagram.
Here are the other classes in Logic (omitted from the class diagram above) that are used for parsing a user command:

How the parsing works:
- When called upon to parse a user command, the
WaddleParserclass creates anXYZCommandParser(XYZis a placeholder for the specific command name e.g.,AddCommandParser) which uses the other classes shown above to parse the user command and create aXYZCommandobject (e.g.,AddCommand) which theWaddleParserreturns back as aCommandobject. - All
XYZCommandParserclasses (e.g.,AddCommandParser,DeleteCommandParser, …) inherit from theParserinterface so that they can be treated similarly where possible e.g, during testing.
Model component
API : Model.java
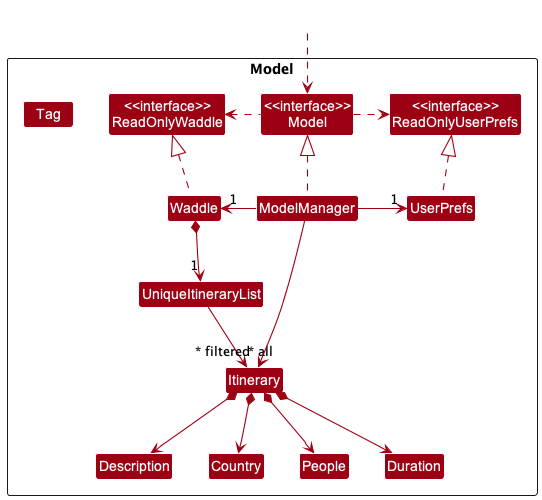
The Model component,
- stores the app data i.e., all
Itineraryobjects (which are contained in aUniqueItineraryListobject). - stores the currently ‘selected’
Itineraryobjects (e.g., results of a search query) as a separate filtered list which is exposed to outsiders as an unmodifiableObservableList<Itinerary>that can be ‘observed’ e.g. the UI can be bound to this list so that the UI automatically updates when the data in the list change. - stores a
UserPrefobject that represents the user’s preferences. This is exposed to the outside as aReadOnlyUserPrefobjects. - does not depend on any of the other three components (as the
Modelrepresents data entities of the domain, they should make sense on their own without depending on other components).
Storage component
API : Storage.java

The Storage component,
- can save both Waddle data and user preference data in json format, and read them back into corresponding objects.
- inherits from both
WaddleStorageandUserPrefStorage, which means it can be treated as either one (if only the functionality of only one is needed). - depends on some classes in the
Modelcomponent (because theStoragecomponent’s job is to save/retrieve objects that belong to theModel)
Common classes
Classes used by multiple components are in the seedu.waddle.commons package.
Implementation
This section describes some noteworthy details on how certain features are implemented.
Plan/Unplan Feature
The Plan/Unplan feature allows users to allocate an item to a particular time slot within a day.
Implementation
The Plan/Unplan mechanism is facilitated mainly by the Itinerary and Day classes. First, let us take a look at class structure of the Itinerary ,Day and item classes.
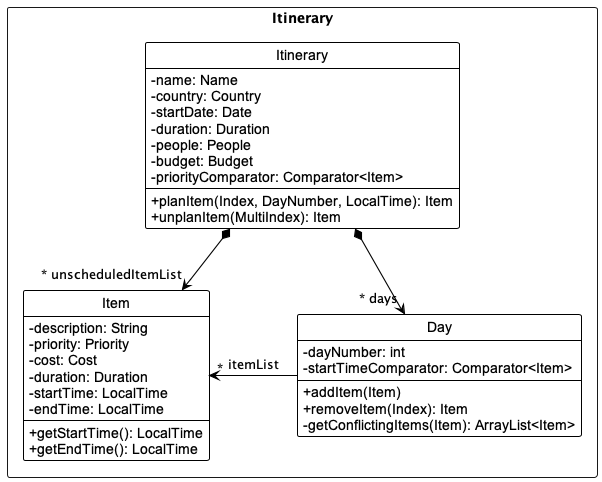
The diagram above is a partial class diagram containing the all the fields and relevant methods needed to understand the Plan/Unplan implementation.
The fields of particular concern are explained below.
-
unscheduledItemList— A UniqueItemList of unscheduled items in an Itinerary. -
days— A List of Days in an Itinerary. -
itemList— A UniqueItemList of scheduled items in a Day.
Additionally, we will explain the methods of particular concern below.
-
Itinerary#planItem(Index, dayNumber, LocalTime)— Transfers the selected item from the itinerary’s unscheduledItemList to the itemList of the selected day. Sets the startTime of the itinerary to the specified startTime. Returns the item. -
Itinerary#unplanItem(MultiIndex)— Transfers the selected item from the selected day’s itemList to the itinerary’s unscheduledItemList. Resets the startTime field of the item. Re-sort the items inunscheduledItemListby order of priority. Returns the item. -
Day#additem(Item)— Adds the provided item into the itemList if there are no time conflicts. Re-sort the items in itemList by order of startTime. -
Day#removeitem(Index)— Removes the item at the specified index from itemList. Returns the item. -
Day#getConflictingItems(Item)— Returns a list of items, in the day’s itemList, that have time conflicts with the provided item. -
Item#getStartTime()— Returns the start time of the item. -
Item#getEndTime()— Returns the end time of the item.
Given below is an example usage scenario and how the Plan/Unplan mechanism behaves at each step. The sequence diagram is a partial diagram showing omitting the details of how the PlanCommand is executed. This detail will be shown in the next sequence diagram.
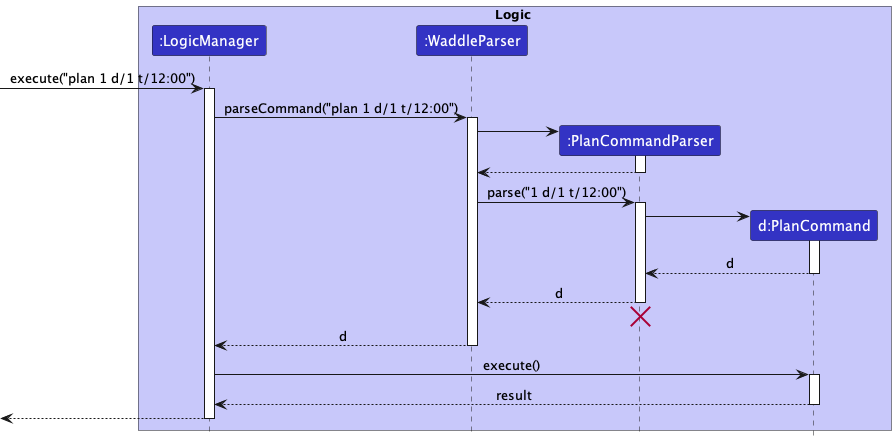
Step 1. The user executes plan 1 d/1 t/12:00 command to plan the first item in the unscheduledItemList to the first day at time 12:00. The plan command is then parsed into a PlanCommand object and executed by the LogicManger. This is similar to what was shown in the Architecture Sequence Diagram under the Design section.
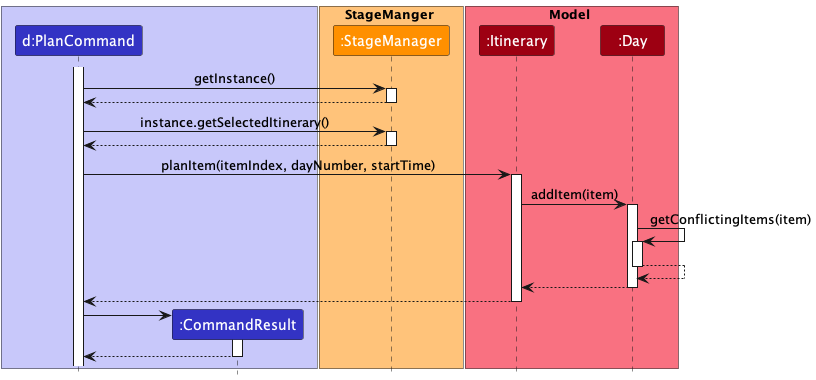
Step 2. The PlanCommand object’s execute() method is called. PlanCommand gets the singleton instance of StageManager through StageManager#getInstance() followed by the current selected Itinerary object through StageManager#getSelectedItinerary().
Step 3. PlanCommand calls Itinerary#planItem(itemIndex, dayNumber, startTime) with the parsed values from the plan 1 d/1 t/12:00 command.
Step 4. Itinerary gets the item from its unscheduledItemList at the specified itemIndex. It sets the startTime of the item and then calls Day#addItem(item) of the Day at index dayNumber with the item.
Step 5. Dayself invokes Day#getConflictingItems(item). If there are no conflicting items, the incoming item is added into the day’s itemList. If there are conflicting items, a CommandException is thrown with a time conflict message.
Step 6. If the item is successfully added, a CommandResult object is created with the success message.
Itinerary#planItem(itemIndex, dayNumber, startTime) and Day#addItem(item), Itinerary#unplanItem(MultiIndex) and Day#removeitem(Index) are called instead.
Edit an item
Refer above for the class structure of the Itinerary ,Day and item classes.
Items can be either scheduled or unscheduled. Unscheduled items are stored in an itinerary’s unscheduledItemList while scheduled items are stored in the respective days’ itemLists. as such, both are handled in slightly different manners.
Given below is a walk-through of the edit item mechanism. We will skip to where the EditItemCommand#execute() method is called since the preceding portion is similar to what we have laid out in previous sections.
Step 1. The EditItemCommand object’s execute() method is called.
Step 2. The multiIndex in EditItemCommand is checked for a presence of a dayNumber. If dayNumber is absent, follow the steps under Unscheduled Items, else follow the steps under Scheduled Items.
-
Unscheduled Items
- Step 3. The index is checked to be within bounds of the itinerary’s unscheduledItemList. If it is not, a
CommandExceptionis thrown. - Step 4. A new
Itemobject,editedItemis created with the edited inputs. - Step 5. A check for duplicates in the unscheduledItemList is done. If there is a duplicate, a
CommandExceptionis thrown. - Step 6. The original item is replaced with
editedItem. - Step 7. The unscheduledItemList is re-sorted in order of priority.
- Step 3. The index is checked to be within bounds of the itinerary’s unscheduledItemList. If it is not, a
-
Scheduled Items
- Step 3. The dayNumber and index are checked to be within bounds of the itinerary’s duration and unscheduledItemList respectively. If any is not, a
CommandExceptionis thrown. - Step 4. A new
Itemobject,editedItemis created with the edited inputs. - Step 5. A check for duplicates in the day’s itemList is done. If there is a duplicate, a
CommandExceptionis thrown. - Step 6. The original item is removed from the day’s itemList
- Step 7. Attempt to add the
editedIteminto the itemList. If a time conflict is detected, the original item is added back into the itemList and aCommandExceptionis thrown. - Step 8. If the
editedItemis added successfully, the itemList is re-sorted in order of startTime.
- Step 3. The dayNumber and index are checked to be within bounds of the itinerary’s duration and unscheduledItemList respectively. If any is not, a
Edit an itinerary
An itinerary’s details (description, start date, duration, and budget) can be edited by changing the fields of an Itinerary object.
Given below are some example usage scenarios and how the editing mechanism is carried out. As per the examples above, we will skip to where the EditCommand#execute() method is called.
Step 1. The EditCommand object’s execute() method is called.
-
Editing an itinerary’s description, budget, and start date
- Step 2. A new
Itineraryobject,editedItineraryis created with the edited inputs. - Step 3. A check for duplicates in model is done. If there is a duplicate, a
CommandExceptionis thrown. - Step 4. The original itinerary is replaced with
editedItinerary.
- Step 2. A new
-
Editing an itinerary’s duration
- The steps are similar but with the additional checks below.
- If the duration is extended, add more Day objects to the Itinerary’s list.
- If the duration is reduced, remove the extra Day objects from the Itinerary’s list starting from the back (i.e., the last Day is removed first).
- The Items that were scheduled in the deleted Days would be unscheduled.
- Update the duration field.
Export to PDF
The exporting feature is facilitated by the Apache PDFBox Java library.
PDFBox converts a fill-able PDF template into an Acroform. Each fill-able field of the Acroform (PDField) can be identified with
a field name and PDField can be filled by calling PDField#setValue(value).
Given below is a walk-through of the exporting to pdf mechanism.
- Step 1. The
PdfCommandobject’sexecute()method is called. - Step 2. A new
PdfFillerobject is created with the current itinerary and a path to the export template. - Step 3.
PdfFiller#fillItinerary()method is called. - Step 4.
PdfFiller#fillDay()method is called with each Day object in the itinerary. - Step 5. In each
PdfFiller#fillDay(), the list of scheduled items will be converted to a list of PDFieldInfo which contains the description of the item as value and a name which identifies the PDField the item is supposed to fill. - Step 6.
PdfFiller#fillForm()method is called. - Step 7. An acroform is generated using the template pdf and each PDField in the acroform is filled up according using the list of PDFieldInfo which specifies the PDField to fill and the value to fill with.
- Step 8. The filled up forms for the different days are then appended together and export as one pdf.
PDF will be stored in the user’s Documents folder with the naming being “
Documentation, logging, testing, configuration, dev-ops
Appendix: Requirements
Product scope
Target user profile:
- has a need to plan itineraries for trips
- prefer desktop apps over other types
- can type fast
- prefers typing to mouse interactions
- is reasonably comfortable using CLI apps
Value proposition: Provides a distraction free and fast way to plan itineraries
User stories
Priorities: High (must have) - * * *, Medium (nice to have) - * *, Low (unlikely to have) - *
| Priority | As a … | I want to … | So that I can… |
|---|---|---|---|
* * * |
user | see usage instructions | refer to instructions when I forget how to use the App |
* * * |
user | add a new itinerary | |
* * * |
user | delete an itinerary | remove itineraries that I no longer need |
* * * |
user | find an itinerary by keywords | access an itinerary without having to scroll through the entire list |
* * * |
user | edit the details of an itinerary | |
* |
user with many itineraries in Waddle | sort itineraries by date | see which trips are coming first |
* * * |
user | add activities to an itinerary | |
* * * |
user | edit activities in an itinerary | |
* * * |
user | schedule activities in an itinerary | |
* * * |
user | select an itinerary for planning | |
* * * |
user | see the activities i have added in an itinerary | schedule better |
* |
resourceful user | import others’ itineraries | to reference |
* |
user who travels in groups | create a split schedule | different groups can do different things simultaneously |
* |
user | share the itinerary to non Waddle users | travel buddies can all use it |
* |
user | mark done activities | |
* |
meticulous | categorise each activity by activity type | |
* |
unique user | create custom activity categories | |
* |
fast user | use shortcuts | be even faster |
* |
fast user | add custom shortcuts for commands |
Use cases
(For all use cases below, the user begins at the starting page, the System is Waddle and the Actor is the user, unless specified otherwise)
Use case: Add an itinerary
MSS
- User requests to add itinerary.
- User enters the description of the itinerary.
- Waddle creates the itinerary and provides a confirmation to the user.
Use case ends.
Extensions
- 2a. The itinerary description is not entered.
- Waddle shows an error message.
Use case resumes at step 2.
- Waddle shows an error message.
Use case: Edit a specific itinerary’s details
MSS
- User selects a specific itinerary.
- User enters new details of the itinerary.
- Waddle updates the itinerary details and provides a confirmation to the user.
Use case ends.
Extensions
- 2a. The itinerary description is incomplete.
- Waddle shows an error message.
Use case resumes at step 2.
- Waddle shows an error message.
Use case: Delete an itinerary
MSS
- User selects a specific itinerary.
- User requests to delete the itinerary.
- Waddle requests for user confirmation.
- User confirms intention to delete itinerary.
- Waddle deletes the itinerary.
Use case ends.
Extensions
- 4a. User decides against deleting the itinerary.
Use case ends.
Use case: Add an item to an itinerary
MSS
- User selects a specific itinerary.
- User requests to add an item.
- User enters details of the item.
- Waddle adds the item and provides confirmation to the user.
Use case ends.
Extensions
- 3a. The item details are incomplete.
- Waddle shows an error message.
Use case resumes at step 3.
- Waddle shows an error message.
Use case: Delete an item from an itinerary
MSS
- User selects a specific itinerary.
- User requests to delete a chosen item.
- Waddle requests for user confirmation.
- User confirms intention to delete chosen item.
- Waddle deletes the item from the itinerary.
Use case ends.
Extensions
- 2a. User does not provide index of item.
- Waddle shows an error message.
Use case resumes from step 2.
- Waddle shows an error message.
- 4a. User decides against deleting the item.
Use case ends.
Non-Functional Requirements
- Should work on any mainstream OS as long as it has Java
11or above installed. - Should be able to hold up to 500 itineraries without a noticeable sluggishness in performance for typical usage.
- A user with above average typing speed for regular English text (i.e. not code, not system admin commands) should be able to accomplish most of the tasks faster using commands than using the mouse.
- The GUI should be intuitive and easy to understand.
- The system should respond in at most 1 second.
Glossary
- Mainstream OS: Windows, Linux, Unix, OS-X
Appendix: Instructions for manual testing
Given below are instructions to test the app manually.
Launch and shutdown
-
Initial launch
-
Download the jar file and copy into an empty folder
-
Double-click the jar file Expected: Shows the GUI with a set of sample contacts. The window size may not be optimum.
-
-
Saving window preferences
-
Resize the window to an optimum size. Move the window to a different location. Close the window.
-
Re-launch the app by double-clicking the jar file.
Expected: The most recent window size and location is retained.
-
Deleting an itinerary
-
Deleting an itinerary while all itineraries are being shown
-
Test case:
delete 1
Expected: First itinerary is deleted from the list. Details of the deleted itinerary shown in the status message. -
Test case:
delete 0
Expected: No itinerary is deleted. Error details shown in the status message. -
Other incorrect delete commands to try:
delete,delete x,...(where x is larger than the list size)
Expected: Similar to previous.
-